To start, I love airliners. That's the reason I have been in this crazy business for nearly 30 years. Although on the modeling side I am much more of a "tread-head", that is armor and military vehicle modeler due to my military service. But the beauty of airliners is an attractive draw.
Thanks to many of you here, I have learned some neat techniques and got insights and leads on some cool stuff that I plan on building. Kudos to you!
Recently (which being a slow modeler takes us back into last year) I started a few projects in the airliner genre. I have the Minicraft Delta DC-8 which I botched up the engine cowlings and am slowly getting to an acceptable state. I also have a Revell BAE-146 (the STA transporter converted to a passenger -100) which is just awaiting decals.
Which takes me to the DC-4. I have the PAA boxing, with the attractive White over NMF scheme. I have heard it was one of MC's best kits. Great, let's go. I want to build a selection of propliners representing the various carriers which have become Delta via merger, acquisition, etc.

Assembly was great. I may have overscribed the forward fuselage line a bit, but nothing I couldn't live with. I then began the paint job with a nice clean shot of Alclad primer in white. I was amazed at how many touch ups to seams I'd need to do, but it was relatively easy to do..
As the livery called for gloss white over natural metal, I shot a nice base coat of flat white, then masked off the white to apply the metal. I like the Alclad II product and in preparation applied a solid smooth coat of Tamiya gloss black. So far, so good. I was able to get the Alclad aluminum on with only one or two hiccups (my hands touching uncured paint). A few passes with some fine grit sand paper and a re-shoot pretty much solved it. I then let her sit for a few weeks as I had other things going on.
On to the white upper fuselage. After masking, I shoe Tamiya gloss white, and after two nice coats, added Tamiya thinner to the color cup and shot one more light coat. Amazingly, I was finally able to achieve a clean glossy white surface (that tip I found in Aaron Skinner's Airliner Modeling book).

Finally, decaling. As the kit decals were printed by Micro Scale, and I happen to use the Micro Scale Set and Solvent, I know that I had this one in the bag. Following the instructions, I began the process of applying the starboard nose decal, which included the beginning of the cheat line and the forward cabin door. As I gently laid the decal onto the surface wetted with a generous amount of Micro Set, my breath escaped me in horror...the door decal was almost one full door's width aft of where the scribed door was! Expletives were voiced and it took every ounce of my being to keep from making a static model airplane fly.
I wisely set the model down and retired upstairs to my comfy chair. I eventually came to the realization that were I to set this model aside, it would likely never again see the light of day. So I garnered my resolve and set forth to finish decaling the Clipper Racer.

The rest of the decaling was relatively uneventful. Micro Set, apply, dry, Micro Sol. I even got the tail stripes aligned with the fin fillet and was able to melt them into place with three applications of Micro Sol in the process.
Here's the part of the story where you were expecting to hear how I just said to heck with the misaligned door and finished the kit. But alas, I actually said, "I can putty that and hide it with paint". Oh, yes I did. Dumbass.
Using a fine applicator, I carefully laid some thinned Tamiya white putty into the scribed door channels. After allowing the putty a sufficient time to dry, I took a fine sanding stick and attempted to smooth out the door frame, attempted being the operative word. I ended up damaging the surrounding area slightly.
To patch it up, I needed to brush paint as the decals are not sealed. The Tamiya white touch up on the upper section went well. Not perfect, but passable. Down on the NMF side, I got a little silly. I laid down some Tamiya gloss black, but because there was a bit more surface to cover, it went down a little uneven. It did not become apparent until I applied Citadel's Mithril Silver by brush. Yuck!
I was able to slowly and carefully remove most of this patch with a bamboo skewer point. Then I took some 2400-grit sanding film and buffed out the error. Now, I used Citadel's Boltgun Metal, which imparted a similar tone to the Alclad Aluminum. The end result is "passable".
I must say that I did learn several valuable lessons due to this episode:
Thanks to many of you here, I have learned some neat techniques and got insights and leads on some cool stuff that I plan on building. Kudos to you!
Recently (which being a slow modeler takes us back into last year) I started a few projects in the airliner genre. I have the Minicraft Delta DC-8 which I botched up the engine cowlings and am slowly getting to an acceptable state. I also have a Revell BAE-146 (the STA transporter converted to a passenger -100) which is just awaiting decals.
Which takes me to the DC-4. I have the PAA boxing, with the attractive White over NMF scheme. I have heard it was one of MC's best kits. Great, let's go. I want to build a selection of propliners representing the various carriers which have become Delta via merger, acquisition, etc.
Assembly was great. I may have overscribed the forward fuselage line a bit, but nothing I couldn't live with. I then began the paint job with a nice clean shot of Alclad primer in white. I was amazed at how many touch ups to seams I'd need to do, but it was relatively easy to do..
As the livery called for gloss white over natural metal, I shot a nice base coat of flat white, then masked off the white to apply the metal. I like the Alclad II product and in preparation applied a solid smooth coat of Tamiya gloss black. So far, so good. I was able to get the Alclad aluminum on with only one or two hiccups (my hands touching uncured paint). A few passes with some fine grit sand paper and a re-shoot pretty much solved it. I then let her sit for a few weeks as I had other things going on.
On to the white upper fuselage. After masking, I shoe Tamiya gloss white, and after two nice coats, added Tamiya thinner to the color cup and shot one more light coat. Amazingly, I was finally able to achieve a clean glossy white surface (that tip I found in Aaron Skinner's Airliner Modeling book).
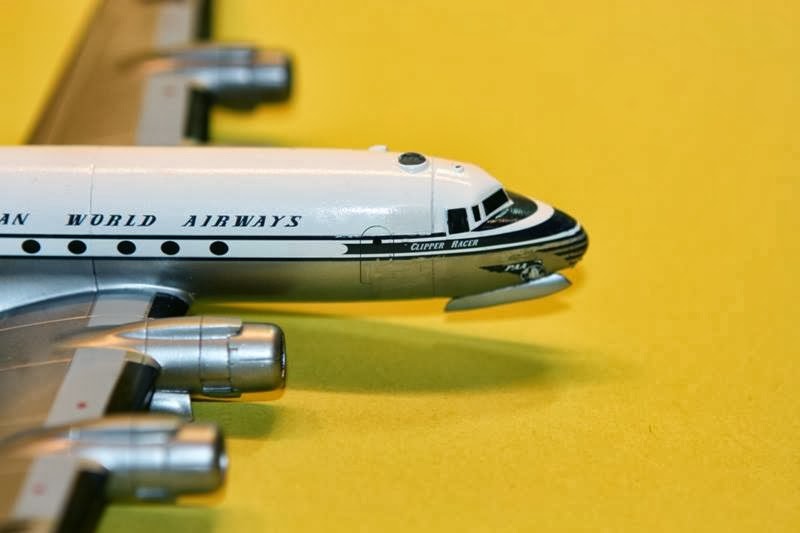
Finally, decaling. As the kit decals were printed by Micro Scale, and I happen to use the Micro Scale Set and Solvent, I know that I had this one in the bag. Following the instructions, I began the process of applying the starboard nose decal, which included the beginning of the cheat line and the forward cabin door. As I gently laid the decal onto the surface wetted with a generous amount of Micro Set, my breath escaped me in horror...the door decal was almost one full door's width aft of where the scribed door was! Expletives were voiced and it took every ounce of my being to keep from making a static model airplane fly.
I wisely set the model down and retired upstairs to my comfy chair. I eventually came to the realization that were I to set this model aside, it would likely never again see the light of day. So I garnered my resolve and set forth to finish decaling the Clipper Racer.
The rest of the decaling was relatively uneventful. Micro Set, apply, dry, Micro Sol. I even got the tail stripes aligned with the fin fillet and was able to melt them into place with three applications of Micro Sol in the process.
Here's the part of the story where you were expecting to hear how I just said to heck with the misaligned door and finished the kit. But alas, I actually said, "I can putty that and hide it with paint". Oh, yes I did. Dumbass.
Using a fine applicator, I carefully laid some thinned Tamiya white putty into the scribed door channels. After allowing the putty a sufficient time to dry, I took a fine sanding stick and attempted to smooth out the door frame, attempted being the operative word. I ended up damaging the surrounding area slightly.
To patch it up, I needed to brush paint as the decals are not sealed. The Tamiya white touch up on the upper section went well. Not perfect, but passable. Down on the NMF side, I got a little silly. I laid down some Tamiya gloss black, but because there was a bit more surface to cover, it went down a little uneven. It did not become apparent until I applied Citadel's Mithril Silver by brush. Yuck!
I was able to slowly and carefully remove most of this patch with a bamboo skewer point. Then I took some 2400-grit sanding film and buffed out the error. Now, I used Citadel's Boltgun Metal, which imparted a similar tone to the Alclad Aluminum. The end result is "passable".
I must say that I did learn several valuable lessons due to this episode:
- Never trust engraved doors, windows, panels on airliner kits. Putty them in the beginning and use decals.
- To achieve a smooth gloss finish, overspray gloss with some thinner mixed with the residual paint in the paint cup and spray lightly over fresh paint.
- Micro Scale decal system works great with Micro Scale decals.
- Citadel Boltgun Metal is a great touch-up paint for Alclad II Aluminum.
- You can go back to fix errors, but don't expect a perfect job in the end.
I am still going to finish this DC-4, and will still build airliners. Screw up, learn, move on.
I am happy to report that my son saw the model and has quickly claimed it for his collection. That made me feel better...
No comments:
Post a Comment